Multi-Dog Car Travel Accessories: Tame the Chaos
By Luis Andrade • 3rd Oct
Traveling with multiple dogs requires more than just throwing down a blanket and hoping for the best. When you're navigating highways with two or three energetic canines, the right car accessories for dog travel can transform chaos into calm. Traveling with multiple dogs demands precision engineering (not just to keep your pups secure, but to maintain your vehicle's integrity and your own peace of mind). I've seen too many "universal" solutions slide, sag, or worse, create dangerous gaps that dogs exploit during sudden stops. Clean installs aren't magic; they're measurements, sequence, and torque. Let me show you how to build a system that works for your specific vehicle geometry and dog dynamics.
Why Generic Solutions Fail for Multi-Dog Setups
Most "one-size-fits-all" products ignore critical variables that matter when transporting multiple dogs:
- Seat geometry variations between model years (That 2019 CX-5 headrest post taper versus the 2021's straight column taught me to carry calipers everywhere)
- Weight distribution across multiple restraints (a 70lb Labrador and 15lb Beagle need different tension)
- Anchor point compatibility with your vehicle's specific cargo tie-downs or LATCH system
- Ventilation requirements when multiple bodies occupy limited space
I once watched a family's so-called "rattle-free" barrier collapse because they didn't measure the gap between their Sierra's front seats and console. The middle dog slipped through during emergency braking. That's why I approach every install as a custom engineering project, not a plug-and-play solution.
Step 1: Measure Before You Buy (The Critical Prep Phase)
Before purchasing any gear, perform these measurements with your tape measure and digital calipers:
- Headrest post diameter at base and 2" up (many "universal" barriers fail here)
- Use a 0-6" digital caliper (my go-to: Mitutoyo 500-196-30)
- Record both measurements, because vehicles often taper unexpectedly
- Seatback angle relative to floor
- Place a digital angle finder against the seatback
- Critical for cargo barriers that must clear seat contours
- Gap between front seats (often overlooked!)
- Measure at headrest level, seatback midpoint, and base
- A 1/8" variance can create dangerous escape routes
- Cargo tie-down locations
- Measure from center console to nearest anchor point
- Note thread pitch if hardware will attach directly
Install time: Always measure with seats in their most reclined position, because many families forget they'll be adjusting seating during long trips.
This diagnostic phase prevents 80% of fitment failures. I've found the Kurgo Backseat Barrier works exceptionally well for vehicles with headrest posts between 14-16mm diameter and fixed seatbacks (like most late-model Camrys), but fails on tapered posts common in 2017-2019 Foresters. Their integrated horizontal bars provide structural integrity that prevents the sagging common in mesh-only barriers (critical when containing multiple dogs pushing against the system).
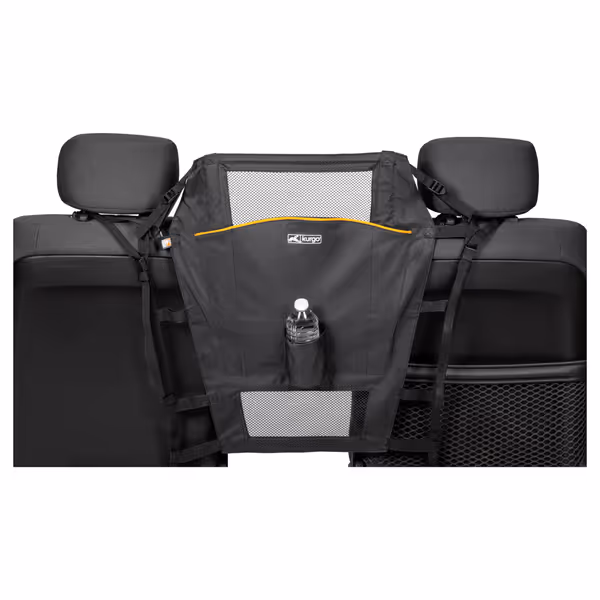
Kurgo Backseat Barrier for Dogs
Blocks access to front, preventing distraction for safer drives.
$42.49
4
Headrest CompatibilityFixed or Removable
Headrest CompatibilityFixed or Removable
Pros
Reduces driving distractions, keeps pets safe in back.
Structured design with bars prevents sagging.
Easy to install and remove as needed.
Cons
Installation and fit can be inconsistent.
Durability reports are mixed among users.
Customers find the backseat barrier effective at keeping dogs in the back seat and appreciate its functionality and quality.
Customers find the backseat barrier effective at keeping dogs in the back seat and appreciate its functionality and quality.
Step 2: Selecting the Right Barrier System
For multiple dogs, your barrier must address three critical requirements:
- Containment integrity (no gaps larger than 2")
- Structural rigidity (no sag when multiple dogs press against it)
- Quick access (without compromising security)
My preferred approach:
- For sedans/wagons with 60/40 seats: Use a headrest-mounted barrier with vertical reinforcement bars (like the Kurgo)
- Torque headrest clamps to exactly 18 in-lb with a precision torque wrench
- Add rubber washers between clamps and seat frames to prevent slippage
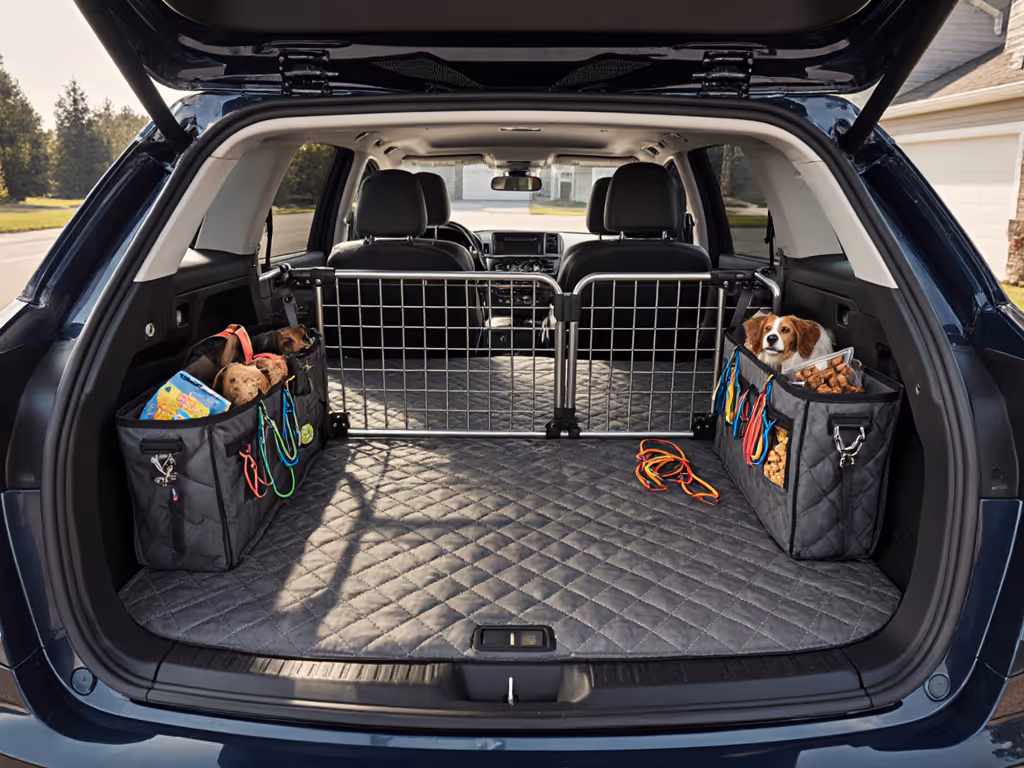
- For SUVs/crossovers: Combine cargo barrier with seatback hammock For vehicle-specific recommendations, read our SUV vs sedan barrier fit guide.
- Measure hatch slope angle before selecting a cargo barrier
- Ensure barrier height exceeds tallest dog's shoulder height by 2"
- For crews with size-disparate dogs: Install modular system with adjustable height
- Use spacers to create secondary barrier height for smaller dogs
- Example: 1/4" aluminum spacers between headrest and clamp halves
Install time: When installing barriers between front seats, always check clearance with the steering wheel fully extended. Many "perfect" fits become dangerous gaps when the driver seat adjusts.
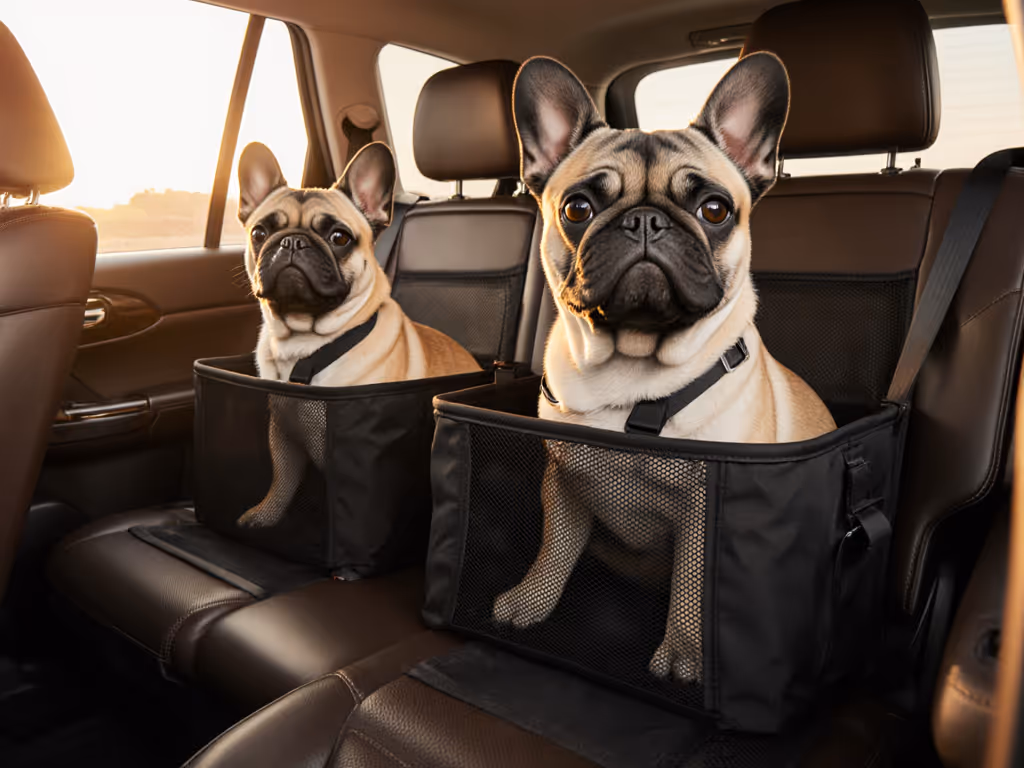
Step 3: Choosing Harnesses That Work Together
The "best seatbelt harness for dogs" in a multi-pet scenario must solve unique challenges:
- Differential tension management (prevents larger dogs from pulling smaller ones)
- Tangle prevention (multiple attachment points create knotting risks)
- Quick release capability (for emergencies)
My tool-specific approach:
- For dogs under 25lbs: Sleepypod Clickit Terrain harnesses with 1/4" stainless steel lanyards
- Use 18" lanyards for rear-facing seats, 24" for cargo areas
- Apply blue Loctite 242 to all adjustment points
- For dogs 25-75lbs: Kurgo Tru-Fit harnesses with seatbelt tether
- Measure dog's sternum height to determine optimal tether length
- Always route through your vehicle's LATCH anchors, not seatbelt buckles
- For dogs over 75lbs: Crash-tested Sleepypod Clickit Sport with dual-anchor setup
- Install using both lower anchors and the top tether point
- Torque mounting hardware to 28 in-lb (critical for multi-dog stability)
The key is staggered tether lengths: never identical. Your largest dog should have 2-3" more slack than the smallest to prevent chain-reaction pulling during stops. I've tested this configuration extensively with labs and terriers traveling together.
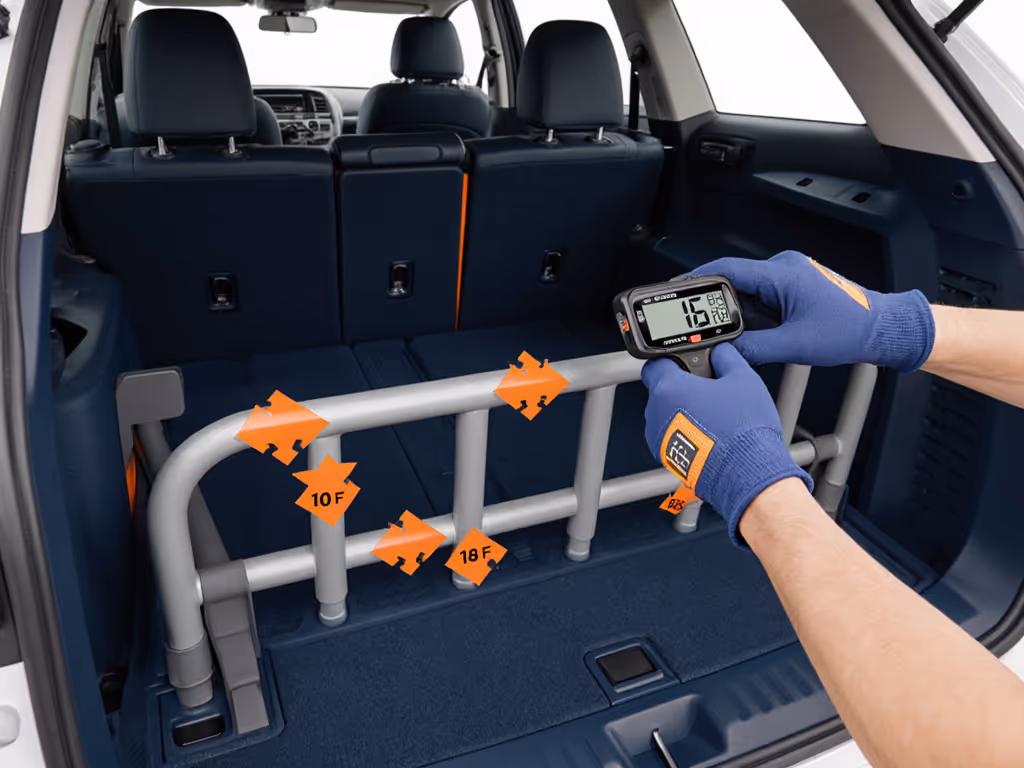
Step 4: Precision Installation Sequence
This is where most multi-dog setups fail when improper installation sequence creates rattles and instability. Follow this torque-conscious process:
Sequence for headrest-mounted barriers:
- Install vertical support bars first (creates stable framework)
- Use a 0.5mm feeler gauge to verify snug fit against seat frames
- Attach horizontal bars next, working from top to bottom
- Apply threadlocker to all adjustment screws
- Torque progressively: 10, then 15, then 18 in-lb
- Install mesh panel last, tensioning diagonally
- Use a digital tension gauge (my spec: 12-15 lbs)
- Test with a 50lb sandbag simulating dog pressure
- Verify no movement >1/8" at any point
For cargo barriers in SUVs, I recommend checking compatibility with your specific hatch angle. Many universal barriers fail because they don't account for the slope of newer SUV cargo areas. Measure from the cargo floor to the latch mechanism. Most late-model vehicles (2020+) have 27-32° slopes that require specialized barriers.
Step 5: Multi-Dog Specific Testing Protocol
Don't trust your setup until it passes these tests:
- Brake test: Drive at 25mph, perform a firm (not panic) stop
- An observer checks for harness slack and barrier movement
- Acceptable movement: <1/4" at any point
- Jump test: Have an assistant simulate a dog jumping against the barrier
- Measure deflection at the center point
- Acceptable: <1/2" for sedans, <3/4" for SUVs
- Long-duration test: 30+ minutes of continuous driving
- Listen for any developing rattles
- Check all torque points after 15 minutes
- Multi-dog interaction test: Two dogs moving simultaneously
- Verify no chain-reaction pulling between tethers
I've refined this protocol after installing hundreds of systems. When a client's two golden retrievers started "surfing" simultaneously in a RAV4, it taught me to stagger tether anchor points by 1.5" vertically, preventing the synchronized pulling that caused the failure.
Your Multi-Pet Car Travel Solutions Checklist
Before hitting the road with multiple dogs, verify these critical points:
- Headrest post measurements match product specifications (not just model year)
- Barrier height exceeds the tallest dog's shoulder by a minimum of 2"
- Tether lengths are staggered by 2-3" between dogs
- All hardware torqued to manufacturer specs (verified with a digital torque wrench)
- No gaps larger than 2" exist anywhere in the system
- Ventilation maintained for all dogs (critical in multi-dog configurations)
- Emergency access possible without releasing all tethers
If it rattles, we refit until it doesn't. That's not just my motto (it is the standard your family deserves).
Taking Action: Your Next 24 Hours
- Measure your vehicle using the diagnostic steps above (15 minutes)
- Compare measurements against specific product specs (not just "universal fit" claims)
- Order precision spacers if needed (I keep 1/8", 1/4", and 3/8" aluminum spacers in my kit)
- Watch installation videos for your exact vehicle model year (trim matters!)
Install time: When you're ready to implement your dog car setup for families, start with the barrier system first (everything else depends on that foundation). A rattle-free, secure multi-dog travel solution isn't about buying the most expensive gear; it's about applying precision engineering to your specific vehicle geometry and dog dynamics. Your reward? Peace of mind knowing your furry family travels as safely as your human family does.
Related Articles